HP Laptop bios password removal
In this tutorial we will show you how we removed the bios password on our HP laptop. The password was put on by us but now forgotten. It was decided to give this laptop to charity as fully functional without any restrictions. The other option was to scrap and send this to the local landfill as we had no use for this laptop anymore.
The procedures below have been successfully carried out by us on numerous occasions.
First of all we must state that our preferred procedure was not created by us. It is only right to give Mazzif the credit he deserves in developing and supporting this procedure.
https://mazzifsoftware.blogspot.com/p/hp-bios-unlock.html
So let’s take a brief look on how we removed the BIOS password on our laptop.
Our laptop was a HP 640 and HP840G3.
Brief description on what we will do and what is required
If you require an in depth tutorial on how this procedure
works head over to Mazzifs website for a detailed and better understanding off
this procedure.
The bios password was installed by us for security reasons and to prevent our user from carrying out alterations on the laptop without the Administrator’s consent.
To remove the forgotten password within the BIOS we will need to read the current BIOS code within the laptop and then alter the bios code to remove the password. This can be done by using the following methods as shown below.
There are three methods available and covered in this tutorial.
Method 1
Our preferred method is to unsolder the BIOS chip from
the motherboard of the laptop and then reprogram and remove the bios password
code with a programmer. This method always works for us but does require some
skill in removing and re-soldering the chip back on to the motherboard.
Method 2
The second method is to use a soic8 clip attached to the
BIOS chip on the laptop and the programmer to alter the code. This is not our
preferred method as this requires good contact between the BIOS chip and the
programmer. We often fail with this procedure due to the poor contact on the
clip that sometimes can occur. Other components on the motherboard can also interfere with reading of the chip hence this method not being our preferred choice. Try this method first and if it continually
fails as a last resort use method 1.
Method 3
The 3rd method is to buy a pre-programmed bios
chip from ebay to replace the bios chip on the motherboard. With this method you
may need to replace both the Main bios chip and the EC (Embed Controller)
chip.
You might also need to let the seller know the SKU,
serial number and the model of your laptop. BIOS image dumps are not
transferable, so you can’t use the same bios code dump on different laptops
regardless of them being the same model.
What you will need to remove the bios password using Method 1
- Programmer – CH341A USB
Programmer to read, write and verify the bios code
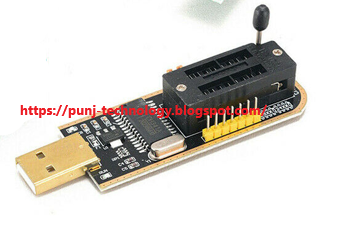
- Adapter - SOIC8 SOP8 to
DIP8 150mil 200mil Programmer Adapter – Required to fit the bios chip to
the programmer

- Soldering hot air station
– Soldering hot air station to de-solder and re-solder the bios chip

- Soic8 pin clip – Useful for the unsoldering method of the read / write of the bios chip using the programmer and the clip

- HP Unlocking tool –
Mazzifs great software for removing the bios code from your original
locked bios
- NeoProrammer software - CH341A USB Programmer software with drivers
- A working laptop / PC with usb ports for installing the programmer
and to carry out the password removal using the unlocking tool. Ours had the latest Windows 10 OS.
The programmer, adaptor and Soic8 pin
clip can be purchased from ebay for under 20GBP
The HP Unlocking tool is available from Mazzifs
website or the badcap forums
https://www.badcaps.net/forum/showthread.php?t=103184
https://mazzifsoftware.blogspot.com/p/hp-bios-unlock.html
Method 1
So now let’s look at our preferred method first. This will require unsoldering of the bios chip
In our example our laptop is a HP840G
1. Download the password unlocking software “HP UnlockingTool” and place this in the root C:\ drive of your working laptop
2. Also create a folder on your desktop and give it a name. Our working directory was called “biosdump”
3. Download the NeoProrammer software with drivers and place this in your working desktop directory "biosdump". This program will be required for reading. writing and verifying the bios dump later. Make sure that the drivers are installed and the program configured and working.

The bios chip was a Winbond 25Q128FVSQ 1553. Note the red dot marking pin 1 on the chip.

6. With the soldering hot air station using a fine nozzle de-solder the bios chip. You can watch youtube if further assistance is required on de-soldering the chip using a hot air station. We set our hot air station @ 250c to de-solder our chip.
7. Once the bios chip is removed let the chip cool down. Place the chip in the SOIC8 SOP8 to DIP8 200mil Programmer Adapter. Make sure you are aware of pin 1 shown with the red dot.

8. Now place the above SOIC8 SOP8 to DIP8 200mil adaptor with the bios chip into the CH341A USB Programmer. You need to make sure that the adaptor is correctly inserted in to the programmer with pin 1 orientation of the bios chip to the programmer socket


- Read this tutorial carefully and follow the steps exactly
- Read, verify and save the existing bios code on the bios chip. You must verify and make sure that you back up and save the original bios code. PLEASE VERIFY the backed up code.
- Always verify the bios code when reading, erasing and writing code to chip from the NeoProrammer software
- If you get a black screen on completion check that you have verified and written the bios code correctly. Also ensure that the bios chip has been soldered with all pins intact with good contact on the motherboard solder pads.
We are providing the
contents here for educational purposes and offer no guarantee that this process
will work for you. On this note you should be aware that by carrying out the
processes here you do so at your risk.