We
would like to thank the original author of this review at www.punj.co.uk for granting us permission to publish
this particular blog content. The original contents of the review can be found
at http://www.punj.co.uk
We are providing the contents here for educational purposes and offer no guarantee that this process will work for you. On this note you should be aware that by carrying out the processes here you do so at your risk
In this tutorial we will help you setup PureVPN on your router with the OpenWRT firmware.
PureVPN offers a great VPN service, with some great apps to get
you up and running on your devices. However we found using and setting up the
service on our OpenWRT router quite problematic. The
support files seem out dated and buggy, and there is little help available on the support pages and internet.
Please remember this tutorial is for creating a secondary VPN only router to
your main primary internet router
You must ensure that you have the following for
this setup to work
Windows
10 OS computer for setting up our VPN router.

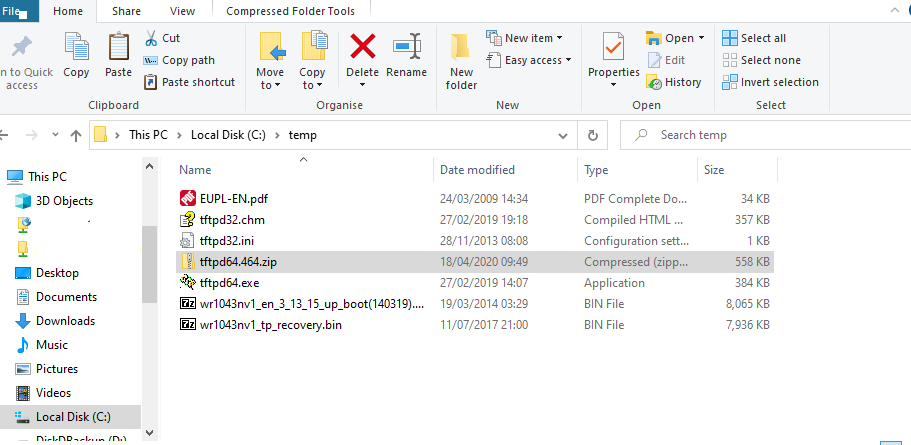
You
will require the following files. Download these and have them on your desktop.
Let’s now carry out the steps
required
Access
and login into the OpenWRT router from your browser
so that we can update and install the necessary router software program files.
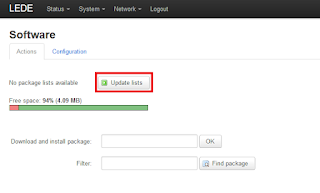
Within
the OpenWRT browser Luci screen go to “System” > “Software”
Now click on the “Update”
button and wait for the screen to update
Now within the “Download and install package” tab enter "luci-app-openvpn
openvpn-openssl" and press the
“OK” button. This will now install the VPN package software to the
router. Be patient for the software to install.

We now need to configure the
OpenVPN package and setup the firewall
Now go to
"Network" > "Interfaces" and click the "Add new
interface" button.

Now Enter "openvpn" in "Name
of the new interface".
Select "Unmanaged" in the
"Protocol of the new interface" box.
Select "Custom interface" and enter
"tun0". Note the zero and not the letter O.
Now click the "Submit" button.

Now click the "Advanced Settings" tab and select "Bring up on boot".

Now
click the "Firewall Settings" tab and select "unspecified -or-
create:". enter "vpn".
Click "Save and apply".
Click "Save and apply".


** Important Note: Please be careful here as you can lock yourself out of LuCI. **
Now go to
"Network" -> "Firewall"
Change on "wan" "Input" and "Forward" to "drop"
Deselect "wan" "Masquerading" and "MSS clamping" checkbox.
Change on "vpn" "Input" and "Forward" to "drop"
Select "vpn" "Masquerading" and "MSS clamping" checkbox.
Click "Save and apply".
Change on "wan" "Input" and "Forward" to "drop"
Deselect "wan" "Masquerading" and "MSS clamping" checkbox.
Change on "vpn" "Input" and "Forward" to "drop"
Select "vpn" "Masquerading" and "MSS clamping" checkbox.
Click "Save and apply".

Now click the "lan" "Edit" button.
Select
"vpn" "Allow forward to destination zones:" checkbox.
Deselect the "wan" "Allow forward to destination zones"
checkbox.
Click "Save and apply".
Click "Back to Overview" button.
Click "Save and apply".
Click "Back to Overview" button.

Your Firewall Zones should
look like the image below.
Note: Devices connected to the LAN will only get internet access when the VPN is enabled.
Note: Devices connected to the LAN will only get internet access when the VPN is enabled.

Lets now add the PureVPN profile.
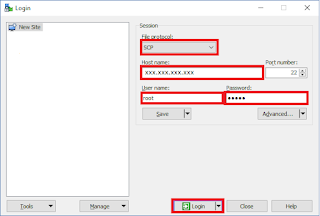
Install WinSCP and run program.
Log in to your router.
Log in to your router.
On
the left window, navigate to your "Desktop".
On the right window, navigate to "/etc/openvpn".
Drag purevpn folder from left window to the right.
On the right window, navigate to "/etc/openvpn".
Drag purevpn folder from left window to the right.

Double click purevpn folder in right window,
then double click on "auth" file.
Enter your purevpn username on top line. eg purevpn0*****
Enter purevpn password on bottom line.
Save and close file.
Enter your purevpn username on top line. eg purevpn0*****
Enter purevpn password on bottom line.
Save and close file.

Now navigate in right window
to "/etc/config".
Rename the "openvpn" file in right window to "openvpn.bak".
Now drag the new "openvpn" file from left window to the right.
Exit WinSCP.
Reboot OpenWRT/LEDE router.
Rename the "openvpn" file in right window to "openvpn.bak".
Now drag the new "openvpn" file from left window to the right.
Exit WinSCP.
Reboot OpenWRT/LEDE router.

Click on the "enabled" checkbox next to purevpn.
Click "Save and apply".
Finally press the "Start" button to enable the VPN.
Note: Connection to PureVPN is a little slow. This is normal

To
change VPN server, go to "Services" -> "OpenVPN"
Click the "Edit" button.
The Server list is available here. This is updated by PureVPN
Note: Select servers with UDP protocol.


Hopefully you will now have a working OpenWRT PureVPN connection.
The Server list is available here. This is updated by PureVPN
Note: Select servers with UDP protocol.
You can now visit www.ipleak.net to check your VPN
status.
As an option you may wish to add the Google DNS Servers.
Go to: "Network" -> "Interfaces" -> "LAN" -> "Edit" -> "DHCP Server" (below the “Common Configuration” section) -> "Advanced Settings". In the "DHCP-Options" enter: "6,8.8.8.8,8.8.4.4".
Click "Save and apply".
As an option you may wish to add the Google DNS Servers.
Go to: "Network" -> "Interfaces" -> "LAN" -> "Edit" -> "DHCP Server" (below the “Common Configuration” section) -> "Advanced Settings". In the "DHCP-Options" enter: "6,8.8.8.8,8.8.4.4".
Click "Save and apply".
Hopefully you will now have a working OpenWRT PureVPN connection.
We would like to thank the original author of this review at www.punj.co.uk for granting us permission to publish this particular blog content. The original contents of the review can be found at http://www.punj.co.uk