On this page we are going to look at on how you can create your windows 7 or 8 media installation on to a usb 2.0 flash drive.
Like us you may have your current windows 7/8 installation media provided on a DVD. By creating your installation media onto a usb drive you will certainly cut the installation time to around 15 minutes compared to the DVD installation which can take up to an hour.
USB flash drives are now very cheap and come in various storage sizes.
To create your windows 7/8 installation onto a usb drive you will need a usb 2.0 4GB flash drive.
As these usb 2.0 flash drives are relatively cheap, using a larger capacity drive sometimes proves useful as you can keep other files on your installation media. An example of additional files would be having additional drivers, and your favourite programs readily available on your installation media.
So here is the check-list of items you require to create your usb 2.0 installation media.
– Windows 7 DVD installation disc or ISO image.
– USB 2.0 Drive minimum size 4GB but the larger the better.
– PC or Laptop running the Windows Operating system.
– Windows 7 DVD installation disc or ISO image.
– USB 2.0 Drive minimum size 4GB but the larger the better.
– PC or Laptop running the Windows Operating system.
In brief our guide will show you how to prepare your usb drive and make it bootable. The final stage is to copy your installation files and folders on to your newly created usb drive.
Please be aware that if you make a mistake in carrying out the procedures there is a risk of corrupting your main computer drive. You have been warned.
Now here is our guide:-
1. Plug in your new clean usb 2.0 flash drive into your PC/Laptop.
In "My Computer" Make a note of the drive letter for the DVD rom drive and your new usb drive.
In our example our DVD drive was shown as the "D Drive" and our usb drive was shown as the "e drive".
2. Now open the command prompt program with admin rights. You can do this by going to the "Start menu" and typing "cmd". You will see "cmd.exe". Right hand click cmd.exe and "Run as administrator". This will open the command prompt with administration rights.
3. Next type "DISKPART" this loads and runs the diskpart application we need for our procedure.
4. The next step is to type "LIST DISK". This shows all the disks within our computer. In our example "Disk 0" was our main C drive and "Disk 1" was our usb drive. In our example we will be using "Disk 1".
5. Now type "SELECT DISK 1". In our example this was our usb drive. If your usb drive was shown as Disk 2 or any other number then type "Select Disk" and then that number that your usb drive was shown as. Be careful and make sure you only choose the usb drive number.
If all is well you should see as in our example a confirmation stating "Disk 1 is now the selected disk".
6. Our next step is to ensure that our usb disk is clean. We can do this by typing "Clean".
6. Our next step is to ensure that our usb disk is clean. We can do this by typing "Clean".
You should get a successful response ‘DiskPart succeeded in cleaning the disk”.
7. The next step is to create a primary partition and format our usb drive. To do this we type "Create Partition Primary" You will see a confirmation that the primary partition has been created.
8. Now type "Select Partition 1" to select the the partition on your usb drive.
7. The next step is to create a primary partition and format our usb drive. To do this we type "Create Partition Primary" You will see a confirmation that the primary partition has been created.
8. Now type "Select Partition 1" to select the the partition on your usb drive.
9. We now need to type "Active"
10. The next step is to format our usb drive. We can do this by typying "format fs=ntfs quick" This will format our usb drive. Wait until you have received confirmation that the format has 100 percent completed.
11. We now need to type "Assign" and then "Exit" to exit from the diskpart program.
The final few steps is to make our usb drive bootable and copy our installation files and folders onto our newly created usb drive.
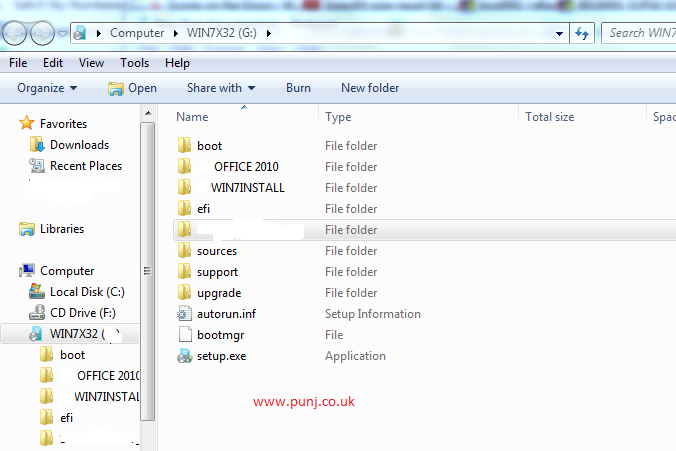
12. To make our usb drive bootable we type d: cd boot. This takes us to the boot folder within our dvd rom drive which has our windows 7 / 8 installation media.
Now type "Bootsect.exe /nt60 e:.
In our example e: is our usb drive. Substitute the e: with the letter of your USB drive. This procedure will create a boot sector on the USB drive.
Finally you can exit the command prompt and copy the files and folders on the Windows 7 DVD to the USB drive. Do this as you would normally copy and backup files to the usb drive.
Once all the above steps have been completed you’ll be ready to boot from your newly created bootable usb installation drive.
You can now install windows 7/8 installations much quicker and this should save you between 40% to 60% of the time it takes from a DVD disc.
We hope our readers have enjoyed our project and will come back to www.punj.co.uk for our views on more technological projects and products.
If you have enjoyed our latest tip or wish to discuss this further then please leave your comments and suggestions below.
We hope our readers have enjoyed our project and will come back to www.punj.co.uk for our views on more technological projects and products.
If you have enjoyed our latest tip or wish to discuss this further then please leave your comments and suggestions below.
We are providing the contents here for educational purposes and offer no
guarantee that this process will work for you. On this note you should
be aware that by carrying out the processes here you do so at your risk.
No comments:
Post a Comment